Monday, August 17, 2015

Before and after: Wood Floor refinish

I had a local company refinish the hardwood floors of the upper story.  The worst case was the back bedroom which had the padding glued on.  End results were amazing:

Before:

After:

A final polish still needs to be done but this room went from nightmare to awesome in just a few days.

Friday, August 7, 2015

Master Bedroom: replacing painted over heat registers with a new one

This was a fairly difficult job as the two originals were attached to the wall with very long nails and also embedded with a thick layer of paint.  After many frustrating minutes of using a utility knife, a cat's claw, and some brute strength, I was finally able to free it.


The new register is made by Decor Grates and purchased via Amazon.  The back of the inside has a lip as does the front, so bending of the duct work was required to get it to fit.  That and some judicious tapping with a hammer / wood block to get the new grate to drop into place.


This looks great and will look even better once the wood floors are sanded and polished.

New nickel trim installed for recessed lighting

In the back living room there is a ceiling bump out that has three recessed lighting cans.  The original white trim had been painted over and the "eye" was an abominable peach color.  I decided to replace these with new silver/nickel trim - at only $12 a pop via Ebay it was a good upgrade.

Original lights:


New Trim, same flood lights:


Tuesday, August 4, 2015

Replacing the Ceiling Heater Registers with a new design

The original ceiling heater registers are definitely original - and have been painted over several times.  Instead of trying to hide the register from sight, I decided to draw the eyes to them with something more interesting.

For comparison here is the old unit:


Removing the original took some work with a razor blade but, as you can see, several layers of paint still came with it - so some filler will be needed in the future.  For the replacement I decided on these units from Decor Grates - an "Oriental" wall unit that has a faux rubbed bronze look.  They are fairly inexpensive and not particularly sturdy for foot traffic, but a ceiling location would work just fine.


Replacing Bathroom Wall Lights with a pair of Nuvo 60-2868 fixtures

I find these original faux-carriage lights absolutely hideous, so I was more than happy to replace them.


I found these nice units on Amazon - good price and uncommon enough that they don't look like something out of an Ikea catalog.  The glass is curved and held in by a nice looking nickel.  The supplied metal mounting rings didn't quite fit the outlet(!) box that were mounted in the wall, so I had to drill out a section of the ring to get a tight fit.  The end result was quite pleasing:


Soon I plan to replace the hideous three bulb vanity above the mirror.

Friday, July 24, 2015

Adding additional garage lighting

Garages are normally dim affairs, making it difficult to find garden or auto tools.  I often work on my own cars and also plan to use this area as a small gym.  With that in mind I decided to add some additional lighting beyond the single 75W bulb.  The classic fluorescent light is cheap, dependable and doesn't consume too much power.  I bought two shop lights that were four feet long and use T-8 bulbs.  Using the supplied chains I attached them three feet distant from the original bulb and wired them up to the junction box.  Now the garage has plenty of light.


More work than it seems: removing carpet from hardwood floors

The idea seems simple: once you know there's wood floors under some carpet, you should remove the carpet. The upstairs of the house does - or did - have carpet everywhere except two for two of the bedrooms and the bathroom. The rest of this floor, including the hallway, was covered in some medium- quality carpet. We assumed there was wood in the other rooms but didn't know.


After we got the keys at the closing, we did a little more exploring in the house to see what was really there. We found, excitedly, that the main bedroom (I suppose you can call it the master suite) had wood floors underneath.

 
The main floor, however, had carpet over some cement/subfloor. This meant we could remove the carpet upstairs, and wait to see how much a new floor would cost for the main floor. One of the other bedrooms has wood floors as well, but under the carpet and pad, appear to have been coated with an adhesive, that is now a brownish/red.


To remove carpeting, start by pulling it up and off of the tack strip.  After the carpet has been rolled and removed, pull up the padding which is usually stapled in.  To remove the tack strips a hammer and pry bar (or cat's claw) is a necessity.  Slide the pry bar under the wood - aided by a hammer - and then leverage the nails up and out of the floor.  After this was accomplished, it is time to go around and pull up any nails that were left behind.  And then the removal of all the staples.  This last step is best done by a needle-nose pliers since it can get a good grip on the metal.


Later posts will detail stripping out padding glue and the final refinishing job.

Sunday, July 19, 2015

Introduction: The purchase of our project house

We've purchased two houses in the past - a 1920s Arts & Crafts two-story, and a 1950s bungalow, both which required plenty of work to restore and/or bring up to modern tastes.  When we decided to buy a home in East Grand Rapids, a mid-century modern was nowhere on the radar.  In our price range we were expecting something small or perhaps even rundown, but were willing to make some sacrifices provided we could stay in the area.

This is a neighborhood of very expensive homes, the majority built in the early part of the twentieth century.  But clinging to this upscale area are several dwellings of more modest means.  So after seeing many houses - and losing out to quite a few - we managed to put an offer on this house after seeing it the very first time.  That's the kind of competition that is driving the market here.

This is what we bought, a bi-level built in 1961.  Some 2000 square feet of living space.


On the main floor - the "two" living rooms - what we now call the "front room" and the "back room." This is the front room:


The back room should be a lot of fun, it also includes a small dining area (the tiled area in the front of the photo), a slider to the deck, and has a fireplace built into the wall:


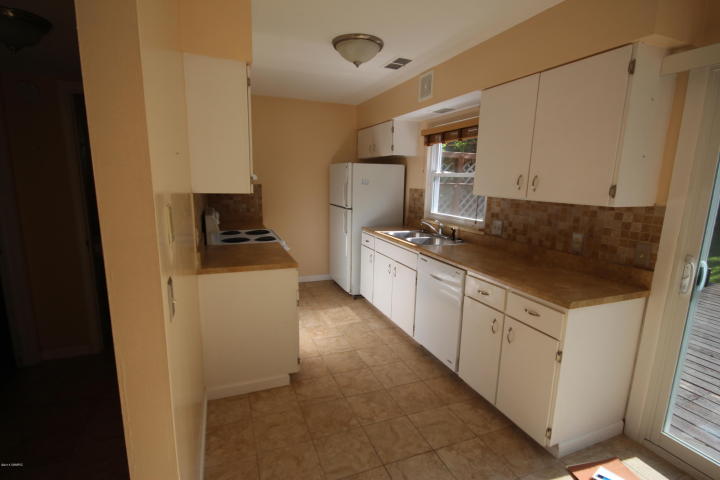
The kitchen is on the main floor -  also a small bathroom and a laundry room:


The wide stairs lead to a large bathroom and the bedrooms - the front door can be seen here:


Master Bedroom:


And the three other bedrooms - one which is so small that it will be used as an office:


and the large bathroom:


Here's a backshot of the house showing the low-pitched roof and two-stall garage, along with an almost four-story mulberry tree.  Backyard is fairly sizable for this area, but certainly not huge.


As you can see we have a lot of work to do here.  It's been rented out for a number of years, and those years of rental have taken their toll. The floor plan - the front half-sunk in a hill, and the bi-level split - makes for a rather efficient use of space, but there isn't much extra for storage.  There is no basement and not much privacy from fellow family members unless you escape to a bedroom.

Long-term plans will include all new siding, wood floors all-around, air-conditioning, electrical updates, mid-century furniture, new front door, and a whole mess of other projects to make this home a truly special place.  So come and join us as we blow a lot of cash, bruise up some knuckles, and do the work required to transform our house into our own little masterpiece.